Using Your Lever Integration
This is a user guide for recruiters that have a Lever integration will RippleMatch.
What is the purpose of this document?
This document is for all recruiters who utilize the Lever <> RippleMatch integration. This document will provide information on the following:
What features are supported by the Lever <> RippleMatch integration?
Candidate Push
This allows us to push a candidate's application from RippleMatch to Lever, instead of requiring the candidate to manually complete an external application. Their application will be automatically pushed directly into Lever.
In addition to the candidate’s application, we will push the following candidate information into Lever:
-
Full Name
-
Email
-
Phone Number
-
Resume
-
Other Attachments
-
E.g. transcript, portfolio, extra documents, etc.
-
-
Candidate Source
-
This allows you to easily identify that RippleMatch is the source these candidates are coming from within your ATS
-
-
URL
-
This is a link to the candidate’s RippleMatch profile
-
Expected Behavior
- Upon clicking Advance on a candidate in your review feed, you will see a new screen called Advance to Next Step
- On this screen, you should see a drop down list titled ATS Integration. This list will contain all of your open requisitions within Lever, however the default selection should be to the corresponding Lever requisition for this RippleMatch role
- Click Advance to trigger the upload of this candidate into Lever
- Then, you can log into Lever and search for the name of the candidate that you’ve just advanced and find their application along with the additional candidate information outlined above
Here is a short video outlining what this should look like!
Below are additional features available with the Lever <> RippleMatch integration
Upload Rejected Candidates & Custom Rejection Reasons
This feature can be enabled for the Lever <> RippleMatch integration. When enabled, it allows rejected candidates in RippleMatch to be uploaded into Lever, with a specific custom rejection reason.
Expected Behavior
-
When you click Reject on a candidate in RippleMatch, you will have the option to select the reason why you are rejecting the candidate
-
This will directly reflect the rejection reasons you have set up in Lever
-
-
Then, upon rejection, we will upload the candidate to the Rejected stage for that role within Lever
Here is a short video outlining what this should look like!
Best Practices
In this section, you will find some best practices to ensure a seamless integration.
-
Open Requisitions → we are only able to send candidates to a requisition if it has an Open status within Lever. If you need to close a job posting within Lever, please notify your CSM immediately and either provide a new Req ID you’d like us to use for your RippleMatch role or let us know to Pause or Remove the role from the platform.
Frequently Asked Questions
What level of access does the user initiating the Lever <> RippleMatch integration need?
Users that are granting access for the Lever <> RippleMatch integration must be a Super Admin in order for the integration to seamlessly function.
Can we get a candidate’s responses to the supplemental questions set up within the requisitions in Lever?
At this time, we are only able to send through supplemental questions responses by way of the Candidate Portfolio. The Candidate Portfolio is a PDF attachment which we can send with the candidate’s application.
Are we able to send any other candidate information outside of the ones mentioned
above (i.e. education, work history, etc.)?
At this time, we are only able to push the candidate data outlined in this section of this document.
Are duplicate candidates uploaded into Lever?
Yes, duplicate candidates could be uploaded into Lever. RippleMatch does not have the ability to scan existing candidates in Lever before uploading a candidate.
Is there a delay in when candidates are advanced from RippleMatch to when they show
up in Lever?
Candidates should show up in Lever within 5 minutes of being advanced
If I add a new role to the platform, how do I map this newly added role?
First, you will need to collect the Lever Req ID of this newly created role. To find this, you can do the following:
-
Navigate to Lever and click on Jobs > View Job Site > External Job Site
-
Find your newly created role
-
Copy and save the Req ID provided in the URL

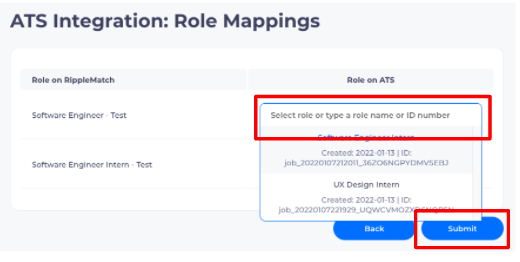
Then, you'll want to log into RippleMatch and navigate to the Integrations Portal. From there, click Edit next to the Lever icon. Then continue clicking Save and Continue until you get to the Role Mappings screen.
Once you're on this screen, you will be able to map your newly created RippleMatch role on the left by searching for the Lever Req ID on the right!

How can I get additional information on the Lever <> RippleMatch integration?
For questions related to setting up your Lever integration, please reference this Set Up Guide. To view our Frequently Asked Questions related to Lever, please reference this article.
For all other questions, please email support@ripplematch.com, reach out to your Customer Success Manager, or reach out to your Solutions Architect.
![1-RM.png]](https://resources.ripplematch.com/hs-fs/hubfs/1-RM.png?height=50&name=1-RM.png)