![1-RM.png]](https://resources.ripplematch.com/hs-fs/hubfs/1-RM.png?height=50&name=1-RM.png)
In order to setup your Workday Integration, you will need to follow these steps:
- Find Workflow Step ID
- Generate REST credentials in Workday
- Create Custom Report
- Custom Report URL (Web Services Enabled)
- OAuth must also be enabled
- Gather Reference IDs
- Gather your Job IDs
- Integrate in RippleMatch
The steps below will walk you through the process necessary to successfully complete your Workday integration.
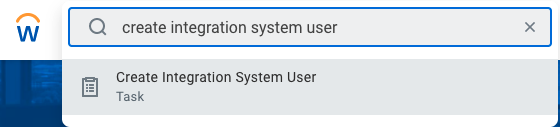
Log in to Workday and type in Create Integration System User in the search bar. Then, click the Create Integration System User task.
Fill in the Account Information as follows:
-
User Name: RippleMatch_ISU
-
New Password: create a password of your choosing
-
Note: choose a password that you wouldn't mind potentially sharing with the RippleMatch team
-
-
Session Timeout Minutes: 0

Click OK. Click Done. Save the ISU Username and Password for a future step. Next, user the search bar to locate the Maintain Password Rules task and click into it.

Scroll down to the Session Timeout section of this task and add the ISU Username created in the last step to the System Users Exempt from Password Expiration field.

You should now see the new ISU Username appear in the box of other ISUs. Click OK. Click Done.
Please be sure to check if you have an Authentication Policy in place which could deny inbound connections. If so, you will need to exempt this newly created ISU Username.
Next, use the search bar to locate the Create Security Group task and click into it.

Then, fill in the Create Security Group form as follows:
-
Type of Tenanted Security Group: Integration Systems Security Group (Unconstrained)
-
Name: RippleMatchISSG

Click OK. Then, under the Integration Systems Users section, search and select the ISU Username created in Step 1-A.

Click OK, and then Done. Save this ISSG for a future step.
Using the search bar, look for Maintain Permissions for Security Group and click into it.

In the Source Security Group field, search and select the ISSG created in step 1-B and click OK.

Then, reference the below table to add all of the necessary permissions listed in column Domain Security Policy. Please reference column Operation to determine whether the Domain is a Get and/or Put.

Click OK. Click Done.
Repeat the sub-steps under Step 1-C for all of the below domains:
|
Domain Security Policy |
Operation |
Why this is required: |
|
Candidate Data: Job Application |
Get and Put |
Get: Required for getting Job Application Data for Imported Candidates, facilitating the upload process for Automatch Candidates and checking Candidate Status.
Put: Required to create applications for AutoMatch Candidates who are uploaded to Workday |
|
Candidate Data: Attachments |
Get and Put |
Get: Needed to access the resume for imported candidates
Put: Needed to upload a resume for AutoMatch candidates(and other related documents, i.e. transcripts) |
|
Job Requisition Data |
Get Only |
Get: This is used to get job data to allow role mapping between RippleMatch and the ATS. In the future this will be used to pre-populate roles in RippleMatch from the ATS as well. |
|
Manage: Evergreen Requisitions |
Get and Put |
Get/Put: Same as Job Requisition Data, only needed when customer uses Evergreen Requisition |
|
Integration Build |
Get Only |
Get: This is needed to get configuration data needed to support various integration features including Custom Source Mapping and EEO data |
|
Candidate Data: Personal Information |
Get |
Get: Required to get key information necessary for matching and creating imported candidates (e.g. First Name, Last Name, Email, etc) |
|
Candidate Data: Questionnaires |
Get and Put |
Get: Enabling this will include a Candidates answer to the Questionnaire in the Get Candidates Payload.
Put: Enabling this will include a Candidates answer to the Questionnaire in the Put Candidates Payload. For non-Imported Candidates (i.e. RippleMatch candidates), this will upload the candidate's answers into Workday. |
|
Job Requisitions for Recruiting |
Get Only |
Get: This is required for importing candidates and getting the data of the Job Requisition related to the candidates application |
|
Move Candidate |
Put Only |
Put: This ensures that a recruiter action in RippleMatch (e.g. advancing from Review to Screen) is also reflected in Workday. |
Once you have completed Step 1-C for all of the above domains, head over Activate Pending Security Policy Changes to publish the change.
Navigate back to the homepage by clicking on the Workday icon on the top-left of the screen. You will find your Tenant ID in the URL, which will look like a series of letters and numbers that immediately follow .com.
For example, if your URL is https://impl.workday.com/example/d/home.html, then your Tenant ID would be 'example'. Save this Tenant ID for a future step.
Using the search bar, locate the Public Web Services report and click into it.

From here, locate the Recruiting (Public) web service listed and then click the ellipsis icon near the words Recruiting (Public) to reveal a drop-down menu.
Select Web Service > View WSDL, which displays the full WSDL in a separate window.

Scroll to the very bottom of that page to find the Recruiting WSDL URL.
The Recruiting WSDL URL is the part of this line that reads https://wd2-impl-services1.workday.com/ccx/service/bnb_dpt1/Recruiting/v37.0. If you're unfamiliar with the WDSL, you can use Command + F to search the doc for "soapbind:address" which should locate the Recruiting WSDL URL for you. Save this Recruiting WSDL URL for a future step.
Using the search bar, locate the Public Web Services report again and click into it. From here, locate the Integrations (Public) web service listed and then click the ellipsis icon near the words Integrations (Public) to reveal a drop-down menu.
Select Web Service > View WSDL, which displays the full WSDL in a separate window.

Scroll to the bottom of that page to find the Integrations WSDL URL.
Save this Integrations WSDL URL for a future step.
Using the search bar, locate the Maintain Recruiting Sources task and click into it.

Add a new source for RippleMatch by clicking the + button in the top left-hand corner.
In the Recruiting Source Category Name field, add in a title that feels most relevant to you. We used External.
Next, click the + sign to the right of the Name field. Then, enter RippleMatch in the Source field.
Click OK. Click Done.

Using the search bar, locate the Integrations IDs report and click into it.

Type Applicant Source into the Business Object field. Select Applicant Source and click OK.

Then find the new Applicant Source titled RippleMatch that you just created. In the far right column you'll see a Reference ID that is written in this format: Applicant_Source_ID.
Save this Applicant Source ID for a future step.

Step 2: Disposition Reason IDs
If you are utilizing the Upload Rejected Candidates Integration feature for Workday, please gather the Workflow Step IDs for each Disposition Reason.
To do this, simply go to decline a candidate in Workday, select each disposition reason, and click on the 3 dots. (Please see images below)

Next, click into the Workflow Step link and click on the 3 dots. From there, go to Integration IDs -> View IDs.


Please copy the displayed Workflow_Step_ID
Then repeat step 2-A for all disposition reasons.
Note: Recruiters likely leverage a small set of disposition reasons for candidates at the 'Review' stage. These are the most important disposition reasons we will need.
Step 3: Generate REST credentials
Generating REST credentials allows you to create a custom report and expose it as a web service via Workday's Report as a Service (RaaS) interface. This is necessary to enable and display both questions and answers to applications. To provision REST to access Workday custom reports, the following are required credentials:
-
Client ID
-
Client Secret
-
Refresh Token
-
Custom Report URL (Web Services Enabled)
-
Additionally, OAuth must be enabled for these credentials.
Step 3-A: Copy the Client ID and Client Secret
The client ID and client secret are needed to provision REST to access Workday custom reports. (45 seconds)
Log in to the Workday tenant. In the Search field, type Register api client for integrations.

Select the Register API Client for Integrations task.

On the Register API client for Integrations page, in the Client Name field, enter the client name as “RippleMatch” and select the Non-Expiring Refresh Tokens option.

In the Scope (Functional Areas) field, select Tenant Non-Configurable under the list of Custom Objects.

Click OK.
The Client ID and Client Secret are displayed - Copy the Client Secret and Client ID.

Click Done.
The non-expiring refresh token is needed to provision REST to access Workday custom reports. (1 minute)
Log in to Workday. In the Search field, type View API clients and select the View API Clients task.

On the View API Clients page, click the API Clients for Integrations tab.

Click the client you created.

Click the three dots next to the client name in the top left, and then click API Client > Manage Refresh Tokens for Integrations.

On the Manage Refresh Tokens for Integrations page, in the Workday Account field, enter the Workday account of a user with access to the custom report.
Set up the user as a service account instead of an actual Workday user to prevent permissions from being removed from the account due to a user change.

Click OK.
On the Delete or Regenerate Refresh Token page, select the Generate New Refresh Token option.
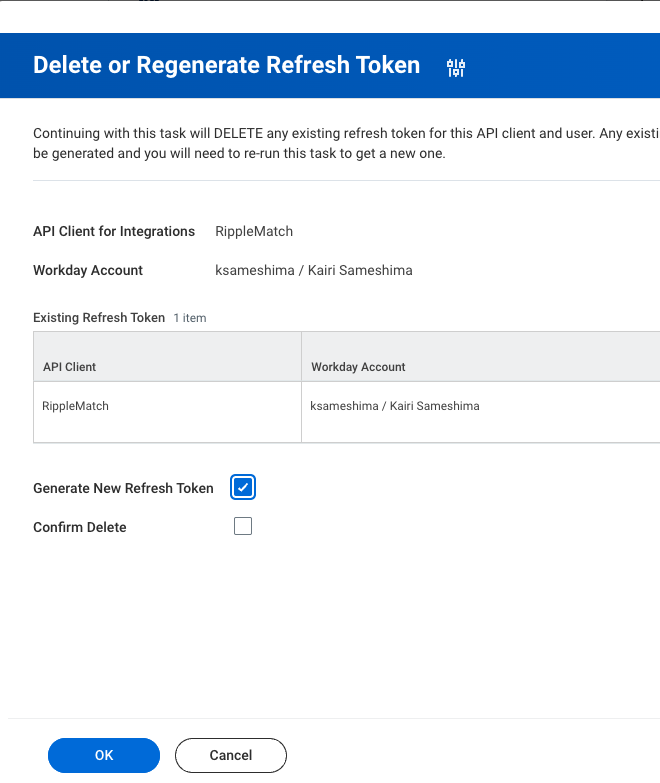
Click OK.
On the Successfully Regenerated Refresh Token Page, copy the refresh token.

Click Done.
Search “Create Custom Report” and select the "Create Custom Report" task

On the create report screen enter the following information:
-
Report Name: RippleMatch Custom Questions (this can be anything)
-
Report Type: Advanced
-
Enabled as a Web Service: True (this checkbox only shows for Advanced report types)
-
Data Source: Questionnaire Answers
-
NOTE: you can only access the Questionnaire Answers object when “Optimized for Performance” is disabled
-

Once you are in the report builder, add the following columns:
|
Business Object |
Field |
Column Heading Override XML Alias |
|
Questionnaire |
Reference ID |
questionnaire_id |
|
Question |
Reference ID |
question_ref_id |
|
Question Item |
Question Type |
question_type |
|
Question Item |
Question Name |
question_name |
|
Questionnaire Answer |
Question Body |
question_body |
|
Question Item |
Question Possible Answers |
answers |
|
Question Item |
Order |
question_order |
|
Question Item |
Required |
required |
|
Question Multiple Choice Answer |
Answer Text |
multi_ans_text |
|
Question Multiple Choice Answer |
Reference ID |
multi_ans_ref_id |
-
NOTE: The order of the fields in the report is not critical, but the values in the “Column Heading Override XML Alias” are required to be exactly the same as below for the integration to function as expected. (Values are case sensitive)

Then under the Group Column Headings section below, add in the Business Objects selected in the above table:
-
Questionnaire
-
Question
-
Question Item
-
Questionnaire Answer
-
Question Multiple Choice Answer
NOTE: The Group Column Heading XML Alias column does not need to be modified in the Group Column Headings table.

Next, select the Prompts tab and select “Populate Undefined Prompt Defaults”.

Then, press “OK” at the bottom of the page.
Once the report is created, you will be able to assign a specific questionnaire to the report and create a web service enabled url to serve the data. To do this
-
Go to the 3 dot menu next to the Report Name
-
Go to the bottom and select “Web Service”
-
Click “View URLs”

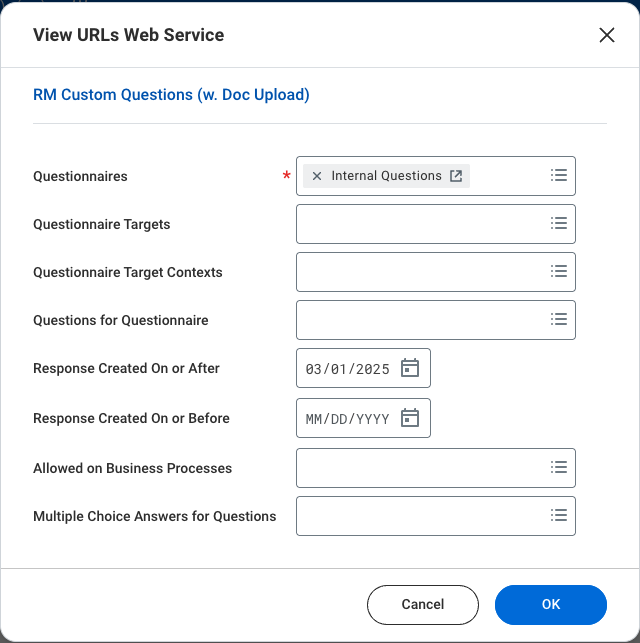
Once you are on the “View URLs Web Service” modal, select the Questionnaire that is associated with roles in RippleMatch
-
Recommended: For “Response Created on or After”, input a date within the past few weeks that is no more than 50k rows of data.
Once you select “OK” you will see a page with several different URLs. Scroll down toward the bottom of the page and copy the link labeled “JSON”. This link can be provided in the integration configuration settings in RippleMatch, or provided to the RippleMatch solutions team.

Step 5: Gathering Reference IDs
RippleMatch does not collect or store EEO information on candidates, but has optional functionality that enables employers to capture a candidate’s EEO information as part of their application and push it into Workday if desired. We do this through mirroring the EEO questions you ask on your application, in RippleMatch. The responses will not be visible to users in RippleMatch. All data collected from these questions will not be reused and will be purged according to our data security policies.
If you want to upload EEO data from RippleMatch to Workday, you will need to provide the EEO Reference IDs for the fields you want to collect information on, as well as how you would like RippleMatch to phrase the EEO questions. Currently, RippleMatch can support uploading the following fields:
- Race/Ethnicity
- Gender
- Disability
- Veteran Status
2A - Organizing Questions
First, you will want to share with RippleMatch how you want the EEO questions to be phrased so we can mirror them.
To find how your organization phrases these questions, you can look at the configuration for an open req on your careers page, or in Workday you can search for Edit External Careers Site --> External Career Site --> the Career Site you want to use.

Next, scroll down to Apply - Personal Information - US. There, you will see the questions.

For each, please take a note of:
- The "Question Text"
- Whether or not it is Required
- What field is being used (please specify if Single select or Multiple Select)
2B - Gathering Reference IDs
Once you have noted the questions above, you will gather the Reference IDs for the different fields you want to collect information on. To gather these IDs, search for View Reference IDs in Workday. Then, search for Ethnicity for example.

Once there, you will see all of the Reference IDs for the Ethnicity field.

Please export/copy and paste the following for each Reference ID Value you want to capture to share with the RippleMatch team:
- Business Object Instance
- Reference ID Type
- Reference ID Value
Next, complete Step 2B for the other fields you want to collect information on (Gender, Veteran Status, Disability).
If the information you want to collect changes at any point, please let RippleMatch know and we will adjust this accordingly.
Step 6: Gathering Your Job IDs
While you're in Workday, navigate to one of your active roles and copy and save the Job ID, which will be found in the following format: R-#####.
Repeat Step 4 for each of your active roles. Save all of the Job IDs for a future step.
Once the above steps have been completed, please reach out to your RippleMatch Solutions Architect to provide the below information. This information can be securely shared with RippleMatch using Doppler.
- ISU Username & Password
- Integrations & Recruiting WSDL
- Tenant ID
- Applicant Source ID
- REST API Client ID
- REST API Client Name
- REST API Client Secret
- REST API Refresh Token
- Custom Report URL